Materials:
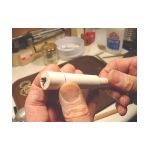
I usually put a piece of masking tape over the bottom of the tube
to keep the clay from running out, but in this case I simply held the tube
firmly against the pounding surface until the first taps made it solid.
A few taps of the mallet, say 8 or 10, and the first part of the clay
plug is set. The another 1/4 teaspoon of clay is added, the rammer
re-inserted, and the second bit of clay compressed with 8 or 10 more whacks.
A third increment of clay is added, the dowel inserted and tapped 8
or 10 times. This makes a solid plug of clay that is a little over
1/2 inch long, and very tightly wedged into the paper tube. It would
seem like these nozzles would blow out easily, but they don't. When
a case like this fails it is usually the header that blows out, or a flaw
in the casing which allows a burn-through.
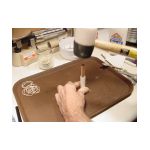
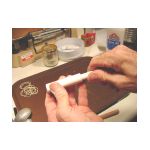
To be fair I must tell you that I did not do much hammering on this
counter. That was set up for the photo. After a couple of light
taps I took this gizmo outside, put it on a concrete block, and hammered
it well. This is not a delicate operation. You can use most
any hammer or mallet, but use heavy ones with restraint. It is quite
possible to destroy the casing - hammer too much or too hard, and the clay
will split the casing. This rubber mallet works OK, as does a steel
hammer. But I think a wooden mallet might be ideal. I will
try that one day.
 |
The magic of Bentonite is that it becomes solid when rammed. It does not need to be wetted and dried. Drying clay shrinks, and may become loose. It also takes time for clay to dry: rammed Bentonite nozzles can be used right away. There is no need to defer gratification, or to put off your experiment for several days while the clay dries. Find out if it works today, so you can think about it until next weekend. |
My Favorite Clay
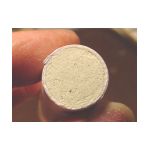
Bentonite is remarkable stuff. A few years ago I had a new well put in. After the driller had left I was rummaging around the trash pile (a persistent habit I am unable to break) and found some bags that said Bentonite on them. I looked inside and in a corner found a little bit of the same stuff I've been purchasing from pyrotechnic suppliers for years. Doing a little research, I discovered that Bentonite is also known as "well-driller's clay" and used for sealing well casings in loose sand, among other things. It is a prime ingredient in kitty litter, and in "Oil-Dri" absorbent clay.
Bentonite is volcanic ash that was deposited eons ago and weathered into an ultra-fine silica. Here is a very nice photo of Bentonite hills in Utah. It is named after the Fort Benton formation in eastern Wyoming. And here is a description of how it is formed. The Colin Stewart Minchem site gives a description of its chemical structure, as well as a list of uses.
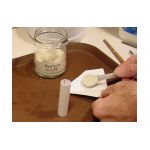
I was running low, so I called a local well driller's supply and said I wanted some Bentonite. The clerk asked: "What kind?" I was unprepared for that question, and hesitated. He said "It comes in several grades. What do you want it for?" I said "rocket nozzles." He said "For WHAT?" but recovered his composure rather quickly. I admitted not knowing much about the stuff, and told him that I wanted the finest, most compressible grade. He said: "You want 'quick gell."
So I went and got some Quik Gel. $13.00 for a 50 pound bag. And the clerk was right. It is the best Bentonite I have ever used. But I was surprised to see on the label that Bentonite is considered a carcinogen, and breathing the dust is cautioned against. Guess its sort of like asbestos - chemically inert but a physical irritant. So I will now take care to avoid breathing the dust and recommend that you do so too!
On the other hand, a Google search for Bentonite Clay generates a list
of dozens of natural-health sites promoting Bentonite for a variety of
health purposes: to dry oily skin, in the bath, for making soap,
for cleansing the bowel.... I didn't see inhaling it as a recommended
practice. It is used as a fabric softener, a pond-sealing liner,
and to make rocket nozzles!
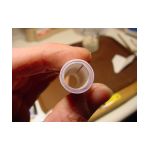
So we must now make a nozzle in this clay plug.
Since your nozzle drill is completed (right?) that will be quick and easy. The reamer is inserted into the plugged tube and twisted until it drills its way through the clay to open air. This usually pushes out a flake or two from the bottom of the plug creating an unsightly irregularity. We will take care of that shortly.
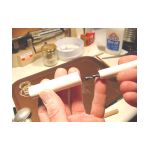
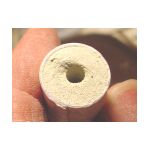
The first reamer I made used an abused old drill bit. It
took a lot of twisting and turning to make a hole. I sharpened it
by hand and improved it a little, but sharpening drill bits is not my forté.
I am much better with knives and scissors. Then I tried a masonry
bit. It worked OK, but was slow. I tried a spur-point wood bit. It was very slow.
The best? A plain old high-speed twist
bit is excellent. But please get a new, sharp one. It's well worth
the $2.00 or so.
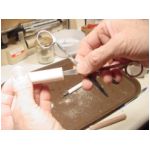
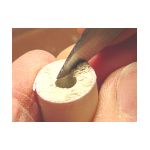
| An exit cone is made by reaming the nozzle pilot with a suitably-shaped
knife blade, or in this case a pair of surgical scissors. Their taper
is a bit too steep. I need to find or make a better reamer for this
purpose. Any suggestions?
|
 |
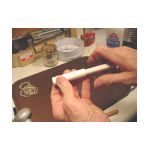
Since the end of the nozzle was chipped, I decided to make it pretty
and scrape with a knife blade to make a shallow taper. This is primarily
for aesthetics - I don't think a few greeblies at this end matter very
much. I am willing to be corrected on that matter if anyone would
like to enlighten me. A good alternative is to rub the nozzle-end
back and forth across a sheet of sandpaper a few times. This makes
a nicely smoothed, pretty end.
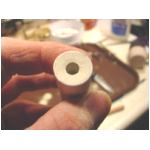
Case is ready for the propellant!
Next...Making the Grain
Jimmy Yawn
jyawn@sfcc.net
rev. 10/10/04
Recrystallized Rocketry Home Page