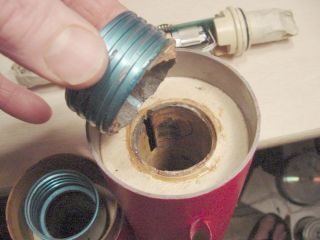
Sugar Sparkles:  Experiments with titanium in recrystallized KN/Sucrose

I met Dennis Welch On my first trip to a NEFAR launch in 2002.  He is proprietor of New Horizons Hobbies, local rocketry supplier and smart guy.  I showed him some of my propellant, hailed its virtues, and lamented its limitations.  One of which was its lack of visible flame.  "Put titanium in it." was his advice.

Some years before I had heard similar advice in a different context.  Having written Robert Cardwell a note describing a really dramatic star formulation I had discovered (actually a minor variation of one in an issue of Pyrotechnica, adding iron filings to an ammonium perchlorate blue star mix) he sent a terse note back explaining how dangerous that mixture was, recommending I use coarse Ti instead of iron, and "suggesting" I be more careful.  I immediately dropped that formula from my inventory.

Never got any titanium, though.  But after the successful rcandy launches last December, I was ready to try something new.  The motors worked really well that day, but there were three flaws.  

One is that there was no visible flame.  Cosmetic defect.  I could ignore that one, but I won't.  

Second is that the rocket did a vanishing act.  Strong thrust and high acceleration for 1.3 seconds and then it was gone.  Up there.  Somewhere.  "Pop" was reported by someone with good ears and I started to breathe again.  At least it wouldn't come down ballistic.  Far from it.  

Third:  On all three of the December flights, both main parachute and drogue deployed at apogee.  I didn't even notice it on the first flight, It was already pretty low by the time I caught sight of it, and I was so excited to see it floating down slowly.  There was little wind, so it landed only a few hundred yards away.  On the second flight someone made a comment about "main at apogee" but I though he was suggesting dinner at Applebee's.  Bad hearing is the most wonderful thing.  With it, even pure noise has profound meaning.  I said "Sure!  Which one?"

The second flight also landed within pleasant walking distance.  I packed it all up and hurried back to get off one more flight.  By the time it was ready the sea breeze had reached our inland spot.  I aimed the airframe a little into the wind and hoped for the best.  

Launch was gorgeous... to about 700 feet when the motor burned out and there was nothing to see.  It vanished.  Guess it didn't help that I had painted the airframe blue.  But a pop was heard, and the NEFAR folks scanned the sky.  Two people with better eyes than mine pointed to it coming down a loooong ways away, and Teresa and I took off in that direction.  We started combing the fields.  And re-combing them.  After an hour I went back for the truck to get the binoculars, and to have something to stand on for a high view.  A couple of other NEFAR folks came to look too.  But it was starting to get dark.  This was becoming unfun.  I felt like calling it off and just letting the rocket stay.  I would buy another kit and build it again.  That would be fun!  The airframe kit was only about $130.  I can afford that.  But wait... the altimeter is in it.  Another $120.  Well, I have a friend who is going to build me an altimeter sometime soon.  Guess I'll need some more paint and epoxy and ...  "Oh no!  the MOTOR CASING!  Gaaa!"  So I resumed my search and did nothing to discourage the others, diligently plodding the fields.  Eventually, Richard Creamer, carrying his young son Casey on his shoulders, spotted it a cow pasture and pointed it out to Teresa.  I was much relieved.  It was in good shape, had missed all the cow patties, and was dutifully beeping out its altitude.  We went home happy.

But I vowed to make some changes.  First off, I had told Michael Kiss that it would be dayglow red next time it was launched. Secondly, it needs to lay down a smoke trail, (or is it "lay up"?)  And it should have a "pretty" exhaust.  Oh, and I need to get dual deployment working correctly.

Changing the color was easy.  The night before a possible commercial launch opportunity that didn't happen, I made a desperate move.  I laid it down on the ground and sprayed it with flourescent orange driveway-marking paint.  It was ugly.  Highly visible, but you wish it weren't.  I pulled off a few oak leaves that had stuck to it, exposing the blue underneath.  Now it has UF Gator colors.  Despite having not one, but two degrees from that alma mater, I just couldn't bear it.  So before this launch I sanded off most of the bad paint, re-primed it and gave it the proper treatment with better-quality flourescent pink paint and 600-grit sandpaper.  Two good topcoats made it shine.  Now it is perfectly hideous, like a Barbie (r) rocket.  But it is smooth.  It will fly.  

Shear Pins

But what about the "dual deployment" of both parachutes at apogee?  It was so consistent that I had to wonder if the altimeter were defective, but couldn't figure out a way to test it with the equipment at hand.  Then I received a note from Mr. Sander Pool, who had seen my pages.  He reported having the same problem with his PML Eclipse, a larger but otherwise similar airframe.  He hypothesized that the momentum imparted by ejection of the drogue pulled off the nose cone and deployed the main.  The scenario is:  1. the drogue ejection charge sends the upper and lower sections of the airframe in opposite directions at a fair rate of speed, 2.  the Kevlar shock cord stops their movement rather abruptly, and 3.  the nose cone continues under its own momentum, dragging the parachute out.  He sent me link to his webpage describing his use of shear pins to prevent this problem, which I followed with slight modifications.  

Actually, I had seen this technique demonstrated by Stuart Leslie at the TRA Sugar Proposal demo launch back in 2002.  I watched in amazement as he drove two little white screws into the fore end of his Patriot airframe.  I had no idea that such a thing could possibly work.  But it did.  It just had never occurred to me to try it myself, and up until this point I had no reason to do so.  

The screws are nylon pan head phillips, #2-56 by 1/4 inch long.  They are from McMaster-Carr, item number 91766A077.  Aren't they cute!

Package of nylon screws, McMaster-Carr # 91766A077  Nylon screws on plate and in fingers

Essentially, the procedure is to drill a small hole through the airframe, into the base of nose cone, and thread a small nylon screw through both.  Mr. Pool did a much better job, reinforcing the base of his nose cone with thin brass sheeting, and drilling much more accurately.  I recommend checking out his page for details.  I cheated and simply drilled a hole through the plastic airframe body tube through the equally-plastic nose cone base.  I have always thought nylon to be pretty tough, and here we are pitting plastic against plastic.  So I ground-tested the shear pin deal a number of times.  It worked OK with 1 pin or 2. Given a choice of likely failure modes, I very much prefer "main at apogee" over "lawn dart" so I went with 1 pin for the launches.

The drill bit is 5/64ths inch, which gives just a bit of "grab" for these little screws.  

Drill 5/64ths inch hole in airframe at base of nosecone   Drive screw into hole   What a pretty little screw!

Since there is only one, I don't have to be very picky about where it goes.  Or do I?  

Here is a ground test using one screw and 2.5 grams of Red Dot in my old shortened Ariel airframe.  Wisely painted red the first time.

Ejection test, 1 tsp Red Dot
(Click for a short video of this test, 1.2 meg .mpg file, 4 seconds of video)

Yes, I am using smokeless powder.  I've been playing with this idea for awhile.  But when I discussed this on the rocketry lists, some folks expressed doubts about using smokeless powder for ejection purposes.  A few had indicated trying it and getting unsatisfactory results.  Hardly anyone was enthused. But I had very good results in dozens of ground tests, the ejection shown above being typical.  

Which led me to wonder if the difference were in the age of the powder.  My can of Red Dot is so old that it doesn't have any red dots anymore.  I've had it at least 20 years, and it lives in the barn where things get pretty hot in the summer.  It is "Brown Dot" now.  Perhaps it has become more vigorous with age?  

So I bought a brand-new can of Red Dot the other day, and did some more ground tests.  
     
Old Red Dot

Who picked out all the red dots?  And why?

New Red Dot

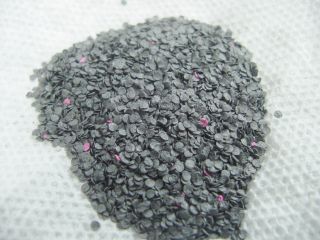
Hey!  These flakes match my airframe!

Here you can see how I packed the ejection charge - just cut a square of paper toweling, wrap the powder up in it with the head of an e-match, and tape it closed.  Thus the powder is not held by any casing stronger than the airframe.  For a launch I will secure it better.  I use an empty Dr. Rocket 38/720 motor casing to hold the ejection wad in its proper position, and run the lead wires down through the fore-end delay-grain port, illustrated here.

The results were just about the same.  New Red Dot worked just fine.  One teaspoon is enough for these 3-inch body tubes.  That is about 2.5 grams.  Before you say "Whoa!  That's too much!" let me assure you that it isn't.  This is not black powder.  And it is not in a shotgun shell.  Seems kinda funny that smokeless powder is not considered "explosive" even though it's active ingredients are nitrocellulose and nitroglycerine.  But it does not burn efficiently unless confined to build up great pressure.  I should know.  I spent much of my adolescence trying to make things explode, and was never very successful with shotgun powder.  Compared to black powder, it's pretty tame.    

Aftermath:  The screw is severed cleanly.  Head can be removed with fingernails.  The bit remaining in the nose cone base can be pushed in with a pointy stick and rattled out.  Airframe is now ready for another screw.  

 Screw head comes off easily   Remainder of screw in base of nose cone    

I have tested this with the Public Missiles Quantum-Tube Ariel about a dozen times using the same hole.  It is still tight enough to grab the screw.  There is no obvious wear or damage on either it or the body tube.  Guess when it finally strips I'll have to patch this hole and drill another one.  Darn.  Life is hard.

Titanium

So I went online with FireFox and ordered two grades of titanium turnings.  Actually, theirs is an alloy of Ti containing 6 percent aluminum and 4 percent vanadium.  I will assume this makes no difference, and hope that assumption is not a dumb one.  Using aluminum with nitrate-based propellant is not recommended, as there is a potential for exothermic reaction in the presence of moisture.  There is always some moisture in my propellant.  And I do not know anything about possible reactions with vanadium, but several knowledgeble folks assured me that this alloy should be OK so I will carry on.  

The "coarse" grade is -10 +20 mesh, which I think will be good for large, crackling sparks.  The "fine" grade is -20 to 200 mesh, which I think might make a shorter but denser tail.  All this is hypothetical, but in a series of  static tests, this seems to be borne out.  In all cases there were lots of sparkles.  

Smoke Trail

The most obvious trick would be to use two of the grains for propulsion, and have the third grain uncored and inhibited at the head end, so that it becomes a simple end-burner just generating smoke.  Did a few tests with the 38/360 casing, and got pretty good results.  But this design uses up 1/3 of the case capacity with non-propulsion propellant.  I want more.  

 I spent a bit of time thinking about smoke-trail possibilities, and considered some pretty wild ideas.  Here is the one I eventually settled upon:


Two grains are made in the usual manner, pretty near ideal Bates dimensions.  A half-length coreless smoke grain is made, and the top sealed with a layer of epoxy.  The epoxy is clear so it doesn't show in the picture but it's there.  Another half-length cored grain is made to fill the gap.  This way I get at least 5/6ths of the propellant pushing the rocket.  Actually a little more since the smoke grain contributes as an end-burner.  Overall, I think this will make for a slightly-regressive burn profile.  Initial thrust should be similar to the December 03 launches, but tapering off somewhat toward the end of burn.

What's wrong with this picture?  I did not actually fire this load as illustrated.  I made a goof.  Somehow my first molding base from Loki got misplaced, and I was desperate to make grains.  So I went to the wood lathe and turned another one out of maple.  And I made another coring rod, but in a fit of stupidity cut it from 1/2 inch hardwood doweling.  Notice that the cores on the grains are rather small.  Now I don't really know if a grain column this short would have a problem with erosive burning, but since these loads are for flight tests in front of a crowd, I want to be sure they work.  So I made another 5/8ths inch coring rod for future grains.


But what to do about these small-core grains?  I could just put them back into the toaster oven until the propellant softened and mold them again.  But launch-day is coming up and I have just barely enough casting tubes, can't afford to waste any.  Drill the core?  Nope.  Not with all that titanium just waiting to spark.  I like my body parts rare, thank you.  Very rare.

Back in December I had made five loads for the launch and only got to fire three.  The other two have been stored in the paper/phenolic liner tubes since then, with several layers of plastic-wrap rubber-banded over each end.  So I drag out the leftover grains and look at them.  The seal was obviously not perfect, as the propellant was gooey on the surface.  But a little scraping of the ends and core revealed hard propellant underneath, so the plan can happen:  I will use the 1/2 inch cored grains at the head end of the motor, and one 5/8ths inch cored grain at the nozzle end.  This will also put the new, dry propellant up there with the ignitor, and the old, damp grain will be downstream, where it can't help but ignite.  Right?


The scrapings were weighed, and averaged about 5 grams per grain.  Not a huge loss.  They were dissolved in water and given as a treat to lettuce patch.  It immediately went to seed.


Launch day!

NEFAR Amateur launch.  We get to do our own things.  

The launch site is near Bunnell, a two hour drive from my place.

On the way to the launch site, we passed this little bar and noticed the sign.


It makes me wonder how the game of karaoke/darts is played.  Does this have anything to do with the name of the bar?  Seems like a natural:  Darts might well improve the quality of the music, or lessen its quantity.  I want to be on the Darts team.


Launch 1


You can laugh at me.  You can laugh at my rocket.
But don't make fun of my hat.  This is Florida, you know!  


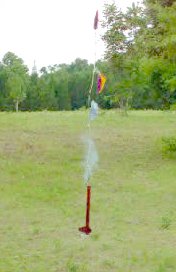
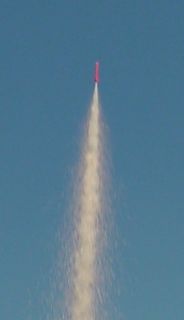
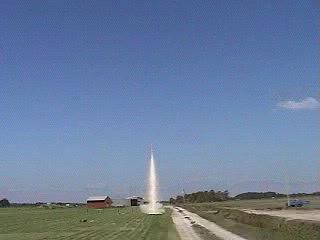
(Click for full-sized photo, 800x1600, 900k!)

(Click for .mpg video of launch, 1.9megs, 7 seconds)

Launch was good.  Exhaust was sparkly, as planned.  Propellant contained about 5% coarse titanium flakes.  

Deployment of drogue occurred at apogee, as planned.  

Deployment of main.... main.... main.... come on main!  klunk!  
Main did not deploy as planned.  

Foretube bounced up in the air several feet.  
 

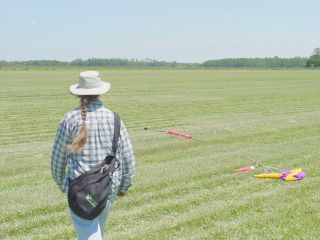
I went over to survey the damage, and am relieved to see  that it still looks mostly like a rocket.

But the upper body is no longer straight.
Bad news.

The tube comes open with a slight pull.  
More bad news. It's not just bent, it's broken.

But the altimeter is still on, and beeping out its happy tune:  3744 feet.    


The phenolic tube which holds the altimeter was broken just south of the aluminum threaded fitting.  Not only does this piece of tubing hold the altimeter, it holds the forward section of airframe on.  It was a ragged break.  Below the break the tube was cracked, distorted, and a few chunks missing.

Why didn't the main deploy?  At first I feared that the Red Dot had proven too wimpy to pop off the nose cone.  I wrestled the altimeter out of the tube.  The powder container was closed.  Opened it up, and unburned powder spilled out:  Dumped it out and looked at the ignitor:  It had not fired.  Hmmm.  A Daveyfire failure?  Not likely.

In messing with the wires, one of them came out of the terminal by itself.  What?  I had tightened them well!  Could the flight have loosened it that much?  
 
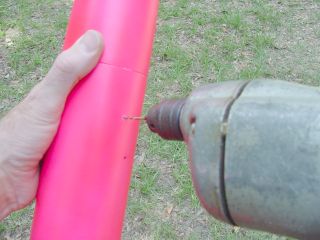
Then I relalized my idiocy.  I had placed one of the lead wires UNDER the terminal gate before tightening.  It must be OVER, as the screw pulls the little gate UP to clamp the wire.

Apparently, the lead stayed in place from friction and/or its own springiness, making contact well enough to pass the continuity tests but not well enough to fire the ignitor.  

So a little birdie yells in my ears:  Tug on the wires!  Duh!  
Altimeter Terminal - loose wire
Wire in wrong hole

Lesson learned.  But it looked like my first launch was also my last.  


Then I thought about the super-glue gel that Steve Pollock had loaned me the day before.  

I was handling the rocket a bit too roughly at the launch pad and had broken off the lower launch lug.  

The super-glue with accelerator worked like a miracle.  But Steve's not here today.

I asked around.  No one had such any such glue.
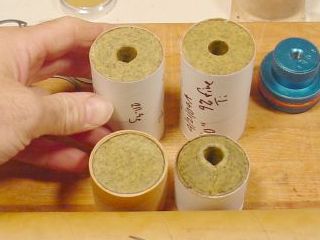
So I went back to the truck, pulled out all my toolboxes and fumbled around.  There were two possibilities.  One was a plain 5-minute general purpose epoxy, the other a "Quick-Steel" epoxy putty, the kind where you cut off a chunk, knead it awhile, and use it to stick things together.  

I had my doubts, but didn't really have anything else to do and I wanted to stay around and see the other activities, so I started kneading a chunk of the "steel."  Got my hands awfully messy, but managed to fix the crack in the lower tube.  Scraped out the excess epoxy with a pocketknife and sanded it until the altimeter fit back in OK.

Then I used the 5-minute epoxy to glue the threaded coupling back in.  I figured that since it was thinner, it would get into the nooks and crannies a little better.  (You might note that the pictures above were taken at home long after the fact, as much epoxy is evident and it is still broken - a portent of things to come.)

Cleaned the motor casing, watched a few launches and a static test or two, and tried desperately to get the glue off my hands.  No luck. Guess it will wear off in a year or two.  After about 20 minutes hardening time, I tenderly reassembled the tubes.  To my surprise, they didn't fall apart. In fact, they seemed pretty sturdy.   So I started getting another launch ready.  


Launch 2:
 
This one has double Titanium.  The half-grain and one full grain contain 9% coarse Ti, the lower grain contains 10% fine and another 9% coarse Ti.  
On this load, instead of having two normal Bates grains and one short one, I am making two grains, one normal length and one longer.  So this should be a slightly progressive load.  

Sugar Rush, Launch 2 video
(Click for video, launch to apogee, 2.9 meg .mpg file, 11 seconds)


(Click for longer video, countdown to touchdown, 8.6 meg .mpg file, 34 seconds)

This time dual deployment actually happened!  

Launch 2 landing site

Not surprising that the glued joint broke.  I gave it some more epoxy and began prep for a third try.

Here are the specs:

Grain
Length
Core
Weight
Propellant
1
1.612 inches
0 - No core, smoke grain
112.9g
rcandy, 18sec/inch, 9% Coarse Ti
2
3.195 inches
0.625 inch
197.4g
(Same as grain 1)
3
4.622 inches
0.625 inch
295.8g
rcandy, 9% coarse Ti, 10% Fine Ti
Total
9.429 inches

606.1g
This adds up to 12.8% Ti in this propellant

Nozzle throat diameter:  0.465 inch

Since the smoke grain is the same propellant, it is assumed that one web-thickness of it will burn while the thrust grains are going, and thus contribute a little to the thrust.  Web thickness is 0.575 inch, thus 40.4g of the smoke grain is thought to contribute.  Total propellant during "action time" would thus be 533.6g.

Calcs indicate that to throw this airframe weighing 118g and with a COD of about .35 to 2619 feet, this much propellant would need an ISP of 88.2.  Pretty low.  I am used to getting ISPs of 113, sometimes better.  But it is thought that the Ti doesn't contribute much to thrust, since it burns almost entirely outside of the motor.  It is eye candy that adds weight and takes up space.

 So let's figure it without the Ti.  533.6g propellant minus 12.8percent Ti would be 456g plain rcandy.  Run calcs with this figure and the ISP is up to 105.  It is a bit lower than what I have seen in the test stands, but there are other factors that can affect altitude.  For instance, notice the wind noise in the video.  This rocket weather-cocked a bit and so did not fly exactly vertical.  That could account for a few extra ISPs, don't you think?  It landed about 1/4 mile away, even with "close proximity" recovery actually working.

Now you might wonder why I didn't give this fine breakdown on the first flight.  
I hesitate to admit what happened, but will follow the old adage:  If the truth hurts, wear it!  

I lost my notes.  

Please be gentle, Professor McCreary!  I did read your admonition to use a lab notebook and write my notes there and there only.  But I felt so clever, writing down the specs for each load on a 4x6 note card and including it in the package, just like the commercial manufacturers do!  And I dutifully returned all of the cards to my portable magazine, for sure for sure.  Later on, it wasn't there.  Aliens must have taken it.  Or ATF agents.  And they only took one so I would not be suspicious!

OK, another lesson learned.  I sprayed my lab notebook dayglo pink.


Launch 3

Glued and loaded again, I want to try one more shot before the curtain falls.

Sugar Rush, Launch 3
(Click for short video, launch to apogee, 2.3 meg .mpg file, 9 seconds)


(Click here for longer video, countdown to touchdown, 16.6 meg .mpg file,  66 seconds)

Grain
Length
Core
Weight (g)
Propellant
1
1.450 inches
None - solid smoke grain
102.7g
4/21/04A, 10sec/inch, 9% fine Ti
2
1.715
0.5 inch
107.5g
(Same)
3
3.137
0.5 inch
205.8
(Same)
4
3.198
0.625
186.6
12/12/03D3, damp outer surface, no Ti
Totals
9.5

602.6g


Altitude:  3861 feet
Propellant burned during action time:  499.9g,   ISP= 108
Contains 28.2g Ti flakes: = 5.6 percent by weight
Amount of rcandy (propellant minus Ti) = 471.7g,  ISP = 114

OK, so now to admin my math deficiency.  How does Coefficient of Drag figure into the rocket equation?  Using my simple spreadsheet and not figuring on drag, I get an ISPs of 108 or 114, depending upon whether I am counting the Ti as propellant or not.  Not counting drag might have worked with the 4x4 rocket tests since they were very low and very slow, but this rocket is much faster and drag is no doubt a major factor.

When I run RocCAD backwards, giving it all the known parameters but re-running it with thrust numbers until I get the altitude of 3861 feet, then ISPs are 118 and 125, respectively.  I suspect that drag is the difference.

So I guess I need to know about drag.  

www.thefreedictionary.com gives:
coefficient of drag - the ratio of the drag on a body moving through air to the product of the velocity and the surface area of the body

NASA explains the drag equation at:
http://www.grc.nasa.gov/WWW/K-12/airplane/drageq.html

D = Cd * A * .5 * r * V^2
where
Cd = coefficient of drag
A = area of reference (I assume body diameter and frontal area of fins, right?)
r = density of fluid.
V= velocity

Here a tutorial that seems to explain it pretty well:
http://www.worldforchrist.org/races/rockets/why/coasting.htm

Then there is Tom Beach's page

And Randy Culp's treatment:

wind resistance force = 0.5 * rho*Cd*A * v^2 Gaa!  So much math!  I haven't had to think this way in a long time.  
I majored in Psychology.  Studied mythology, not mathology.  
But my SAT and GRE scores indicate higher computational aptutude than verbal.  
I can talk, so I "should" be able to do this math.  No excuses.
Laden with self-doubt, I ask myself:
 

Can Jimmy rise to the equation?
we shall see....

Jimmy Yawn
jyawn@sfcc.net
Recrystallized Rocketry
Join IEAS!