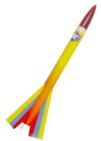
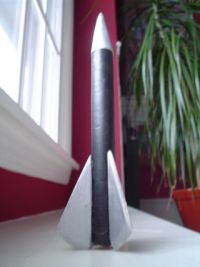
Snap Dragon
Scratch-Built Model Rocket


Part 1:  Intro and Overview

Quick links:
  1. Intro
  2. Body Tubes
  3. Nose Cone
  4. Fins
  5. "Paint"
  6. Finalizing

It delights me that one can buy such a vast array of rocket parts nowdays.  So many suppliers, so much good stuff, so little time.  Nose cones, G10, phenolic tube that fits standard motors....

And I've learned a lot from buying kits and building them.  Like how to put an airframe together.  How to design it so that it is stable.  How to finish paper and balsa so it looks like polished metal....  Every kit has something new to teach me.  

But I have a persistent character flaw that compels me to do everything myself, and then some.  Good thing.  My personality is of the type that deals with emergencies well.  So well, in fact, that I have developed habits that tend to create them.  Unfortunately, that's not a joke.  Procrastination, for instance.  It's crude and common, but remains a very effective technique for creating emergencies.  I use it a lot.  No amateurcrastination forme, I am a pro!

For instance.  Back in October I had scheduled a session of Rocket Science 101 through Community Education.  A few days before the class, I  went to the storage room and finound my box of Estes Alpha kits.  It was empty.  I should have ordered another box of them from Dennis back when I signed the contract to teach.  Oh, well.  I can always go buy them at retail.  What's money for, anyway?

Two days later I went to Mall Wart and and wound my way to the rocket department to find the precious Alphas.  They had some boxed almost-ready-to-fly kits, complete with launch controller and stand, but when I looked at the wall where the not-nearly-ready-to-fly kits had been, there was other, non-rocket stuff.  The kits were gone!  No Alpha kits, nor anything like them on display.

Not to panic!  (well, maybe a little panic.)  I can do this.  There is a way.  Over the years I have made a number of model-rocket-like airframes from stuff lying around.  I had been thinking of consolidating the better bits into a standard model, and here is an opportunity with a pitchfork.  

These pages are a tribute to the students of that class, who provided me the motivation to develop this model, a chance to observe real people building them, and to test-fly a number of them with commercial rocket motors.  It is a documentary of some things I learned from making these "kits," and even more I gained from the participants themselves.  Thanks guys!

Now the rocket has a name!  

Ken, of Delanco NJ made several of these rockets using colored posterboard for the body tubes.  His kids chose the colors, and his daughter Kristen gave them a clever and charming name.  

So with her kind permission, I hereby christen this rocket model the
"Snap Dragon."
 

Thanks, Kristen!
Fairy Art by Margaret Tarrant.

Procedure

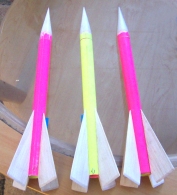
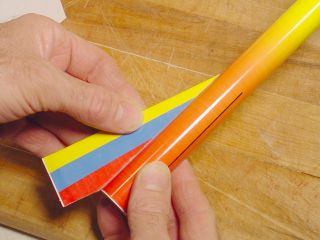
Body Tubes  
Made from posterboard and spray glue, they are quick, cheap, easy, and sturdy.  Can be made lighter, at the expense of some sturdiness, or heavier, for greater strength.  

This technique is adaptable to many other rocketry uses, such as inhibitor tubes, case liners, and small motor casings.
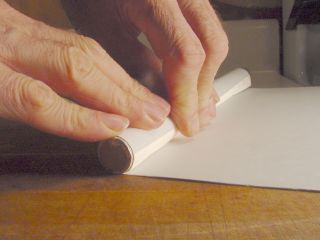
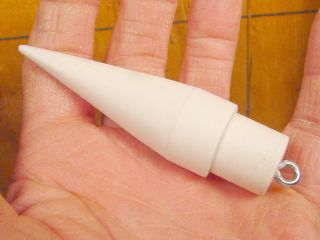
Nose cone
Sure, it's nice to have a wood lathe.  But you don't really need one to get started.  These cones can be "turned" with agile fingers from a 3x5 card, and are reinforced with epoxy.  For what they lack in aerodynamics, they make up in simplicity and strength.
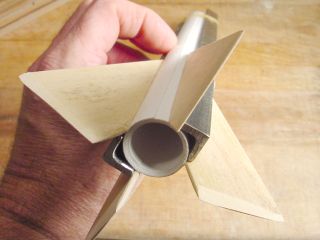
Fins  
I use a simple, functional design, subject to aesthetic and perhaps aerodynamic improvement.  Includes making and installing the launch lugs.
Body Covers  
An easy way to create a fancy "paint job" for your rocket.
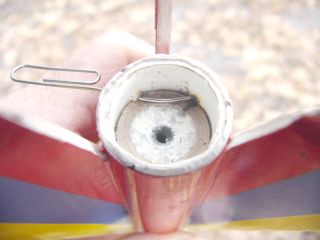
Finalizing  
Thrust ring, shock cord mount, recovery streamer, motor retention, and launch video.
Rocket Science 101 class photo
Rocket Science 101
Photos of the October class launch, where this model was tested a number of times.  

Everyone in the class assembled at least one rocket, some made more than one.  On launch day, they were flown using Estes motors.  

Except for some ejection failures, they all performed well and proved sturdy enough to survive a "lawn dart" recovery to fly again.  I believe that my new motor retention system will solve the ejection problem, we shall see....
Gallery

Here's one by Geoffrey Andrews which he has named Moonstone.  I like that name - it matches the colors well.  The tube is carbon fiber, both lighter and stronger than the paper tubes I am using.  This one should really fly.  Thanks Geoffrey!


Jimmy Yawn
jyawn@sfcc.net
Recrystallized Rocketry

rev. 2/13/06